Introduction
In a previous post, we discussed the overall design for a home automation system that uses MQTT as the communication protocol. In this post, we’ll dive into some simple examples of how to publish and subscribe to MQTT topics, specifically for sending temperature data.
Example #1 – Simple publish and subscribe
Let’s start with the publish example. Imagine you have a temperature sensor that periodically measures the temperature and needs to send that data to the MQTT broker. Here’s some sample code in Python using the paho-mqtt library
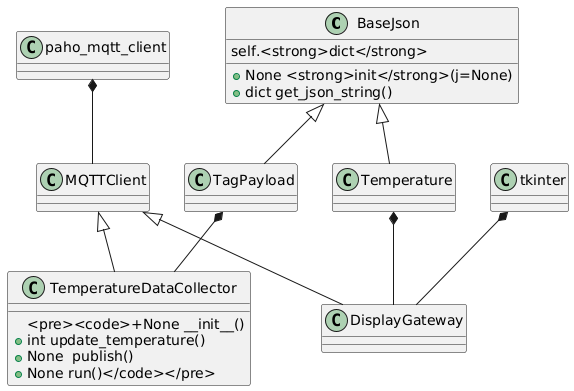
First I’ll show the class diagram and explain a bit the Main class:
This code simulates an IoT device that measures the temperature of a freezer and publishes the readings to an MQTT broker every minute. The temperature fluctuates randomly within a realistic range for a freezer (-10 to 30 degrees Celsius). This type of system could be useful in cold chain monitoring applications or industrial automation systems.
from mqtt_client import MQTTClient
from enterprise import TagPayload
import uuid
import random
import time

class TemperatureDataCollector(MQTTClient):

    def __init__(self):
        super().__init__()
        self.topic = f"freezer/{str(uuid.uuid4())}/temperature/celsius"
        self.temperature = random.randint(-10, 30)

    def update_temperature(self):
        delta = random.randint(-4, 4)
        self.temperature = self.temperature + delta
        if self.temperature < -10 :
            self.temperature = -10
        if self.temperature > 30:
            self.temperature = 30
        return self.temperature

    def publish(self):

        while True:

            self.update_temperature()
            msg = TagPayload(self.temperature).get_json_string()
            result = self.client.publish(self.topic, msg)
            # result: [0, 1]
            status = result[0]
            if status == 0:
                print(f"Send `{msg}` to topic `{self.topic}`")
            else:
                print(f"Failed to send message to topic {self.topic}")
            time.sleep(60)


    def run(self):
        self.connect_mqtt()
        self.client.loop_start()
        self.publish()
        self.client.loop_stop()


if __name__ == '__main__':
    tdc = TemperatureDataCollector()
    tdc.run()
The core part of the implementation is the publish method of the the TemperatureDataCollector, where we have a loop that generates the value, publish it on the broker and wait 60 seconds for the next loop.
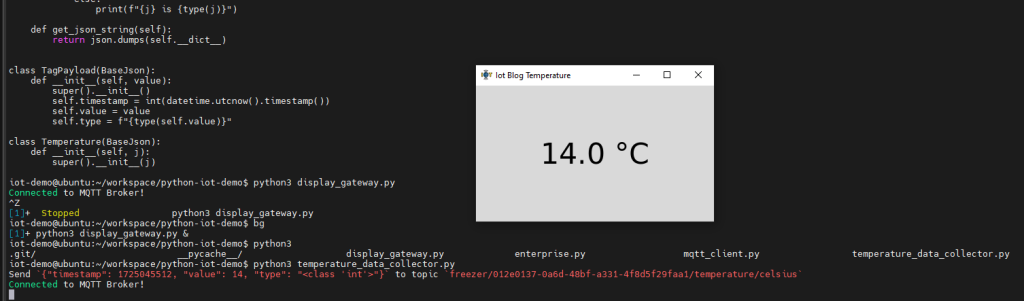
To run the code I use a Ubuntu 22.04 VPS from ionos.com, this is a more shareable and easy way to setup quickly a test environment hassle-free for a very cheep Price like 3 Euros per month.
Note that I’m not affiliate with ionos.com or any other ionos partnet, I just found the web-application quite clean and cheap.
Bellow is a screenshot of the data collector running and publish data every minute

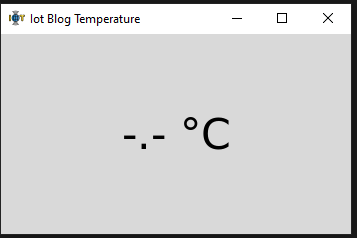
Ok. now, let’s look at the subscribe part. Imagine you have a Smart display or a graphical application that can display the temperature value. In Python we can use the tkinter gui. This is a builtin python library to display the subscribed temperature topic a to get the current value.
In this example, the TemperatureDisplay class creates a Tkinter window with a label to display the current temperature. The update_temperature method is called every 1 second (using the after method) to update the temperature value displayed on the label.
The Gateway class is used to retrieve the current temperature value, which is then displayed in the Tkinter application.
Below is shown the core part of the Gateway Class:
 .....

    def subscribe(self):

        def on_message(client, userdata, msg):

            m_decode=str(msg.payload.decode("utf-8","ignore"))
            # print(f"Received {m_decode} from {msg.topic} topic")
            temp = Temperature(m_decode)
            # print(f"Parsed as {temp}  ")
            self.temperature.set(f"{temp.value}.0 \u00B0C")

        self.client.subscribe(self.topic)
        self.client.on_message = on_message
   ...
In this example, we’re connecting to the same public MQTT broker and subscribing to the home/temperature topic. When a message is received, the on_message function is called, and we can process the temperature data as needed. In this case display it in a application window.
As one can see the temperature is not displayed , as we subscribe for temperature updates and those only happen once per minute the display will be update only when the data collector publish a new value
As you might notice, there will be a period of time when there is not temperature display.
As you might recall on the initial design of the previous post this might not be desired, so we need to work on the solutions explained there.
… This will come soon in a future post, meanwhile you can start play around and give yourself in the implementation, I’m sure it will not be the same as mine and potential better.
I hope these simple examples help you get started with MQTT for your home automation projects. Let me know if you have any further questions! and see you on the #2 post!
Summary of the test environment preparation
After setup the VPS and access to it, preferably using mobaXterm that have all built in tools to forward the screens from the remote server, you need to install the following packages (some are optional):
python3-paho-mqtt             MQTT client class (Python 3)                     - Mandatory as dependency of the examples
mosquitto                     MQTT version 5.0/3.1.1/3.1 compatible message broker  - Mandatory as the mqtt broker
mosquitto-clients             Mosquitto command line MQTT clients              - Optional to subscribe a publish on the command line
idle                          IDE for Python using Tkinter (default version)   - Optional to edit and run Python
geany                         fast and lightweight IDE                         - Optional as a generic gui text editor